How Do I Create and Add Items to My Crowdfunding Campaign?
When you are setting up pledge levels and add-ons for your upcoming crowdfunding campaign, you want to describe what your backers will receive when they make their selection. One of the best ways to do this is to list out exactly which items are included in each pledge level and add-on.

You can assign the items that are included when you set up each pledge level and add-on, and backers will see them when they make their selections during the campaign.
The Items feature enables you to manage all of the items you are offering for your crowdfunding campaign and gives you an overview of how they are assigned to pledge levels and add-ons. It will help you understand the structure of your campaign and keep track of how many of each item gets selected.
Once your campaign ends and transitions into the Pledge Manager, all of your items will automatically import and be ready for setup. From there, you can create additional add-ons to drive more post-campaign sales and add pledge questions to capture details for rewards with multiple options or variants.
Purchase Limit
If you have limited stock of an item, or would like to offer only a set amount, you can apply a Purchase Limit directly to the item. If the item is assigned to a pledge level, add-on, or both, as soon as the Purchase Limit is reached, everything will be marked '0 remaining'.

Important Tips
Itemize Your Pledge Levels and Add-ons
-
When building your crowdfunding campaign, think of your rewards as Items, each with its own SKU. This mindset will make post-campaign fulfillment much smoother once everything imports into BackerKit's Pledge Manager.
Single products should be listed as individual items, while physical pre-packaged bundles that automatically include multiple components should be treated as one item with a single SKU (ex. 'deluxe game'). The goal is to set up your campaign in a way that mirrors how you’ll ultimately track, barcode, and ship these items to backers.
By clearly itemizing your pledge levels and add-ons, you’ll not only simplify logistics but also help backers understand exactly what they’re getting, making it easier for everyone to get excited (and stay organized) from campaign to fulfillment.
Assign Items Consistently
-
If multiple pledge levels or add-ons include the same item, make sure you assign the exact same item across each one. This ensures your inventory, fulfillment, and reporting stay accurate and streamlined.
When setting up your pledge levels or add-ons, you’ll be prompted to choose from existing items you’ve already created. Select the matching item rather than creating a duplicate. This keeps everything organized and prevents confusion later in the Pledge Manager.
Assign Multiple Items
-
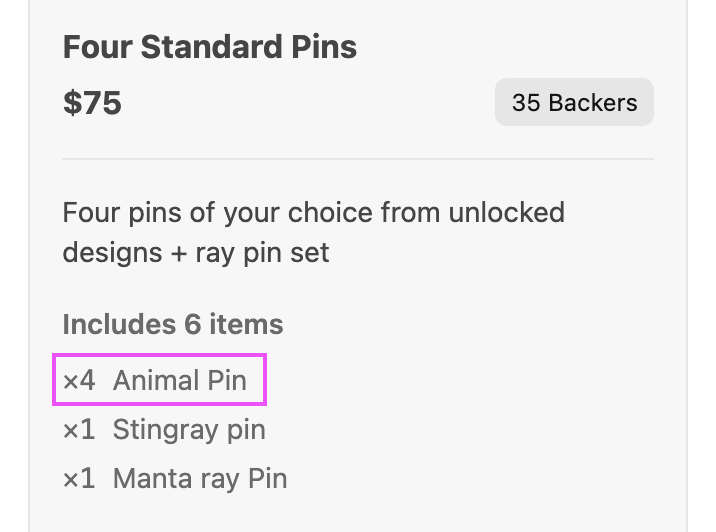
If a pledge level or add-on includes comes with more than one of the same item, assign that Item multiple times rather than creating duplicates.
For example, if a pledge level includes three enamel pins, create one item called “Enamel Pin” and assign it three times to that pledge level. Backers will then see it displayed as “×3 Enamel Pin” in their list of rewards.

Creating Items with Options
-
If you’re offering an item that comes in different variations, create a single item to represent the main product.
For example, if you’re offering an enamel pin available in three designs, create one item called “Enamel Pin.” After your campaign ends, you’ll set up those three design options in the Pledge Manager, where backers will receive a survey to choose their preferred version.
Name Your Items Clearly and Consistently
-
Use clear, consistent names so backers can easily tell your items apart. Good naming helps them understand what’s included, compare options, and make confident decisions when choosing their rewards.
How to Set Up Items
Use any Included Items field in a pledge level or add-on. Begin typing the Item Name, then click Add from the drop down menu. This will create the item, which can then be used in other pledge levels and add-ons.

From the Items page >> Create a New Item. Name the item and apply a Purchase Limit if needed. This is also where you can set up Instant Access Rewards, learn more here.
